What Push-up Protocol Are You Using To Test Yourself?
- Do you currently test yourself in the push-up?
- Is your push-up technique on point?
- How do you know if you’re crushing quality reps?
- If you test yourself how do you know if you’re max effort rep count is accurate?
If you have an interest in learning whether your push-ups are on point then you need to make sure that you’re applying a sound push-up protocol. Today I wanted to expose you to my push-up protocol to give you some solid rules to follow so that you’re not cutting any corners. Check it out.
Push-up Protocol
There are many different test standards when evaluating a quality push-up. For instance, if you look at the military every branch may vary in regards to their standards as to what qualifies as a quality push-up. The fact is that different organizations may have different ways of doing things. This is just going to be the reality.
Regardless of this such variations may include differences in hand position, feet position, and even whether a certain body part can bottom out touching the ground. Such an example might involve whether your chest can touch the ground, or not.
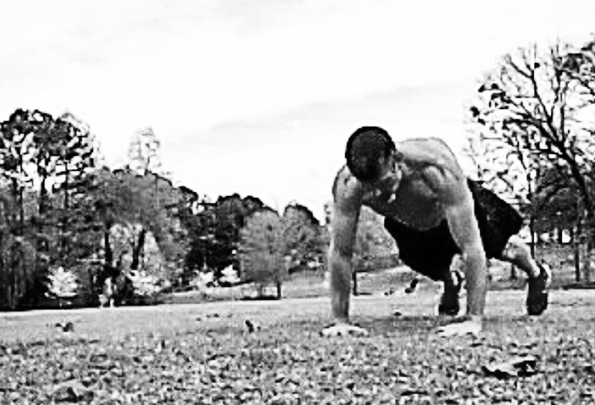
For myself I require that the hands must be placed in a direct line below the armpits when beginning the push-up in the upright position. This puts you (or the trainee) into the first phase of the setup for the movement.
Your feet can be hip width apart.
At the lowest position I’m looking for your elbows to be at a 90 degree angle and for your body to lower as a complete unit without any part of you sagging first towards the ground.
So at the base of your push-up position you should have no knees, hips, or stomach touching the ground. As soon as this happens the set is over.
The thing that makes the push-up such a challenge for many is a person’s ability to maintain the rigidity from their shoulders to their heels throughout the push-up range of motion (ROM).
A few things to note to perform a quality push-up protocol
- Maintain equal weight distribution through each of your hands and arms during the movement.
- Maintain a consistent speed when you’re lowering down and ascending up out of the push-up. Include a two count down and a two count up for a standard protocol speed.
- When performing the movement only your arms and body should be moving. There should be no break towards the floor with your neck, stomach, or knees.
- Quality trumps quantity so when you show the first sign that your technique is breaking down due to battle fatigue the set is over.
An additional element that you might want to add to your push-up test protocol may be to video yourself from a side view angle and do so with a clear view of yourself. You should video yourself from ground level from the side angle so that you can see if you have any of your body parts breaking and sagging towards the ground. This way you can also go about reviewing the footage to get a more true and honest account of what you’re doing with your push-ups.
Push-up Protocol: The Takeaway
This is a good way for you to practice and test yourself with the standard push-up and I promise you’ll progress with your push-up strength if you stick to the protocol technique standards.
Do you currently test yourself with the push-up exercise?
How many honest push-ups can you do at one time?
Post up and share here in the comments below.
Also if you’re interested in stepping up your training and elevating your core strength development make sure you get started on my…
30 Introductory Bodyweight Exercises here below.
Click On Image Here

Also if you want to learn how to tie these together then make sure you check out my brand new 120 Day Functional Fitness Training Program right here below! I guarantee it’ll get you into the best shape of your life, or I’ll give you your money back no questions asked.
CLICK HERE TO ORDER MY 120 DAY PLAN TO POWERFUL FUNCTIONAL FITNESS!!!
It’s changing lives everyday!
Click On Image Here
 Related Articles:
Free Weights vs. Machines In Strength Training
5 Simple Ways To Measure Your Functional Fitness
3 Functional Strength Drills For Fitness And Performance
4 Guaranteed Ways To Get A Functionally Strong Body
4 Ways To Keep Crushing Strength Gains Beyond Your 30’s
The 20/20 Kettlebell HIIT Workout For Shredded Muscle
Click on all images below…
If you’re looking to enhance your fitness for MMA and martial arts then make sure to check out my
90 Day MMA Strength And Conditioning Program Here.

Get ONNIT kettlebells here: (Click On Image)
